The dining table is the heart of a home

Friday, February 18, 2011

Salmon with pesto served on peas risotto


I made this for dinner few weeks ago. We just felt like having something not too heavy and healthy for dinner hence I made this. My family loved it, simple, easy and nutritious.

I just simply love foods that are healthy, delicious and easy to prepare. Especially for working moms or dads who are often caught up at work and got home a bit late, all of us need a few recipes up our sleeves that are quick and dinner will be ready in 30 mins. This is one of those recipes. Hope you like it too. Maybe you can share you easy simple recipes with me too. =)

Salmon with Pesto served on Peas Risotto

Ingredients:
  • 4 pieces of 200 grams salmon fillets
  • Homemade pesto ( please click on the link for recipe)
  • 3 cups risotto rice
  • 6-7 cups chicken stock- keep warm in separate saucepan
  • One brown onion- chopped
  • 5 cloves garlic- chopped
  • 1 cup frozen peas- thawed
  • 4 tablespoons dried mixed herbs
  • salt and pepper to taste
Methods:
  1. Make a few slits on the skin of the salmons. Season salmons well with salt and pepper and brush with some oil on both sides.
  2. Heat up your grill pan ( if you don't have grill pan, normal frying pan will do too) and put the salmons on the pan skin side down first.
  3. Once the skin becomes crispy, flip over to cook the flesh side of the salmon.
  4. Cook the salmons around 3-4 mins on each side. Make sure not to over cook. The flesh of the salmons should still be slightly pink on the inside.
  5. Once the salmons are ready, set aside.
  6. Keep the chicken stock gently simmering in a saucepan
  7. In another pan, heat up few tablespoons of oil. Once the oil is hot, put in the onion and garlic and saute for few minutes
  8. Add in the rice, stirring to coat the rice with the oil.
  9. Add a ladleful of stock and cook, stirring, until the liquid is absorbed. Continue stirring and adding stock one ladleful at a time, waiting until the liquid is absorbed each time before adding more, until the rice is tender and creamy yet still a little al dente
  10. When the rice is almost cooked, add in peas, herbs and season with salt and pepper.
  11. Place rice on a plate, top with salmon and pesto.

Tuesday, February 15, 2011

Chocolate Babka


I have been so busy at work that I have not been posting for almost one week now. Just started a new job and it's been quite busy but fun. Lots of learning and new experiences.

I made chocolate babka last Sunday for tea at home. I first had my Babka at a chocolate shop in melbourne call Max Brener. My neighbour then invited me over to her place few weeks ago and she bought chocolate babka from one of the bakeries around here, but it was made differently. The babka I know is always made into a big loaf or in roll form like cinnamon rolls. But the ones she bought was made into small little rolls and stick them together to make a round cake pan size chocolate babka. It was so delicious. Super duper chocolatey and yummy. Almost like chocolate croissant but with more chocolate punch in it. That started my venture into looking for chocolate babka recipe and I found it from smittenkitchen. But instead of making them into loaves form, I made them into small little rolls and sticked them together. It was delicious with lots of chocolate and looked cute too. All my guests loved them. It was so easy to serve, just cut the edges where the rolls stick together and serve individually. Hope you like it too.

I halved the recipe because it looked too much to do the whole recipe for me. Halving the recipe will be more than enough for 8-10 people.

Chocolate Babka
Adapted from Smitten Kitchen

  • 1 1/2 cups warm milk, 110 degrees farenheit
  • 2 (1/4 ounce each) packages active dry yeast
  • 1 3/4 cups plus a pinch of sugar
  • 3 whole large eggs, room temperature
  • 2 large egg yolks, room temperature
  • 6 cups all-purpose flour, plus more for work surface
  • 1 teaspoon salt
  • 1 3/4 cups (3 1/2 sticks) unsalted butter, cut into 1-inch pieces, room temperature, plus more for bowl and loaf pans
  • 2 1/4 pounds semisweet chocolate, very finely chopped*
  • 2 1/2 tablespoons ground cinnamon
  • 1 tablespoon heavy cream

1. Pour warm milk into a small bowl. Sprinkle yeast and pinch of sugar over milk; let stand until foamy, about 5 minutes.

2. In a bowl, whisk together 3/4 cup sugar, 2 eggs, and egg yolks. Add egg mixture to yeast mixture, and whisk to combine.

3. In the bowl of an electric mixer fitted with the paddle attachment, combine flour and salt. Add egg mixture, and beat on low speed until almost all the flour is incorporated, about 30 seconds. Change to the dough hook. Add 2 sticks butter, and beat until flour mixture and butter are completely incorporated, and a smooth, soft dough that’s slightly sticky when squeezed is formed, about 10 minutes.

4. Turn dough out onto a lightly floured surface, and knead a few turns until smooth. Butter a large bowl. Place dough in bowl, and turn to coat. Cover tightly with plastic wrap. Set aside in a warm place to rise until doubled in bulk, about 1 hour.

5. Place chocolate, remaining cup sugar, and cinnamon in a large bowl, and stir to combine. Using two knives or a pastry cutter, cut in remaining 1 1/2 sticks butter until well combined; set filling aside.

6. Generously butter a pyrex pie pan or round cake pan. Line them with parchment paper. Beat remaining egg with 1 tablespoon cream; set egg wash aside.

Punch back the dough, and transfer to a clean surface. Let rest 5 minutes. Cut into 3 equal pieces. Keep 2 pieces covered with plastic wrap while working with the remaining piece. On a generously floured surface, roll dough out into a 16-inch square; it should be 1/8 inch thick.

7. Brush edges with reserved egg wash. Crumble 1/3 of the reserved chocolate filling evenly over dough, leaving a 1/4-inch border. Refresh egg wash if needed. Roll dough up tightly like a jelly roll. Pinch ends together to seal.

Cut rolls into small 3cm pieces and stick them to each other in prepared pan

8. Heat oven to 350 degrees farenheit / 180 degrees celcius. Brush the top of each loaf with egg wash. Loosely cover each pan with plastic wrap, and let stand in a warm place 20 to 30 minutes.

9. Bake loaves until golden, about 55 minutes. Lower oven temperature to 325 degrees farenheit / 165 degrees celcius and bake until babkas are deep golden, 15 to 20 minutes more. Remove from oven, and transfer to wire racks until cool. Remove from pans; serve. Babkas freeze well for up to 1 month.

* After chopping the chocolate into moderately sized chunks, I used the food processor to pulse the rest of the chocolate in two batches to small bits. It saved a lot of time!

That was the tips and recipes from smitten kitchen, modified slightly by myself just with regards for the arrangement of the rolls.

Try and make it, you won't regret it.

Tuesday, February 8, 2011

Chinese Style Steamed Fish


My mother in law made a great steamed fish dish for our reunion dinner and I'm going to share it with you today.

Personally, I think Chinese language is a beautiful language. You can describe very complex emotions or situations in 4 very simple words or a simple phrase. If you watch chinese dramas, they often use phrases to describe feelings, emotions etc. It's difficult to understand sometimes but somehow the phrases can just translate the emotions in a very poetic and descriptive way.

There's a Chinese saying " nien nien you yu" which means prosperity/surpluses every year. The yu for this phrase is pronounced the same way as yu for fish. Hence, we often serve fish on special occasions or chinese new year which symbolizes prosperity for the coming year. It's a symbolic thing. But I'm not a supertitious person, I'm a believer that all blessings come from God. I just appreciate the beauty and complexity of Chinese language and its culture. However, I do believe that our tongue is powerful. Whatever comes out of it carries power. So instead of saying "I'm doomed" why don't we say "I'm blessed" or nien nien you yu instead....=)....there's nothing wrong with proclaiming good things for our life.

Happy Chinese New Year everyone. Wish all my readers prosperity and joy for the coming year.

Chinese Style Steamed Fish

Ingredients:
  • 1 Barramundi weighing around 700 grams or any other fish will do too eg: snapper, tilapia
  • 1/4 cup julienned ginger
  • 1/2 cup sliced spring onion
  • chopped red chilli- optional
Seasoning:
  • 1/2 cup water
  • 2 tablespoons rock sugar
  • 1 tablespoon oyster sauce
  • 1 tablespoon light soy sauce
  • 1 teaspoon chicken stock powder
  • 2 tablespoons shao tsing wine
  • 1 tablespoon sesame oil
  • Extra 1/3 cup shao tsing wine for steaming
  • 2 tablespoons oil
Methods:
  1. Put all ingredients for seasoning in a small saucepan except the extra shao tsing wine and oil. Boil all the seasoning ingredients until sugar is melted. Taste and adjust seasoning accordingly
  2. Clean the fish and put on top of a plate. Put half of the julienned ginger and spring onion on top of the fish
  3. Pour the extra shao tsing wine on the fish and steam for 10 minutes or until fish is cooked through.
  4. After you finish steaming, pour away the water collected at the bottom of the plate
  5. Pour all of the seasoning mixture on top of the fish and top with the remaining half of the julienned ginger and spring onion
  6. Heat up oil and pour on top of the fish. Garnish with chopped red chillies
  7. Serve with rice

Saturday, February 5, 2011

Choon Kuen aka Chinese Meat Rolls


Gong Xi Fat Chai!!!!

Wishing all my readers and followers Happy Chinese New Year. May this coming year be filled with God's blessings and joy.

I love Chinese New Year. Not just for the food and angpao....but the family. I love having family reunion. Everyone gather together on this special occasion, catching up with one another and just enjoy each other's company.

Usually we have the big reunion dinner before the first day of Chinese New Year. But my wonderful family decided to wait for me to get back to Melbourne because I was posted to Ballarat and we had our reunion dinner yesterday. Of course, we also had the honour of having one of our beloved friend from Malaysia visiting us in Melbourne as well. It was such a wonderful time. We also celebrated my wonderful father in law's birthday. So many celebrations. We really enjoyed it.

The menu for our reunion dinner was:

Yee Sang

We just prepared the vegetables. My mother in law bought
the prepack from Malaysia. It came with all the condiments.
What a great idea. Tasted just like the ones from restaurants


Dried Oyster and Radish Soup ( sorry, brother in law forgot to take photos of these). But it was so good, prepared by my mom in law who is a great cook.

Chinese Style Steam Fish, again prepared by my mom in law. Very nice! Will share the recipe tomorrow so stay tuned.

Kau Yoke with Yam - typical Hakka Dish, collaboration of me and my mom in law


Choon Kuen aka Chinese Meat Rolls by yours truly....=)

My mom always makes Choon Kuen for Chinese New Year. I remember never getting enough of them. She only makes them once in a while and it's one of our family's favourite. The traditional way is to roll the meat mixture in bean curd sheets, steam them and then deep fry in hot oil Or steam the meat rolls ( without beancurd sheets) and coat in flour before deep frying. But I hate deep frying and decided to try the healthier option. I used the same recipe my mom gave me for the meat rolls, but instead of deep frying them I coated them with panko breadcrumbs and baked them. The result? FANTASTIC. I don't think I'll go back to deep frying option in the future. Very nice and crispy and the best part of it? Much healthier option for the family.

Choon Kuen / Chinese Meat Rolls
Ingredients for meat rolls:
  • 500 grams minced pork
  • 500 grams minced prawns
  • 1 small can water chestnuts, chopped
  • 1 carrot, diced finely
  • 1/2 brown onion, finely chopped
  • 1 egg
  • 1 tablespoon cornflour
Seasonings:
  • 2 tablespoons sugar
  • 1 tablespoon light soy sauce
  • 1 tablespoon five spice powder
  • 1/2 tablespoon salt
  • 1 teaspoon ground white pepper
Coating:
  • 2 eggs, beaten
  • Plain flour
  • Panko breadcrumbs
Baking paper and aluminium foil for rolling.

Methods:
  1. Place all the ingredients ( except the ones for coating) and seasonings together in a big bowl and mix well until the mixture becomes rather sticky
  2. Take a piece of baking paper around 25-30cm long. Take a portion of the meat mixture, place on top of baking paper and shape it into long cylinder of around 3-4cm diameter and 15cm long.
  3. Roll the meat mixture tightly with the baking paper. Tie the ends of the baking paper tightly.
  4. Then, take a piece of aluminium foil also around 25-30cm long and use it to roll the meat mixture that is already covered in baking paper.
  5. Repeat the same process for the remaining of the meat mixture. You should be able to make around 5-6 rolls
  6. Steam the rolls for around 30 minutes until cooked through.
  7. Take the rolls out of the steamer. Unwrap the rolls and let cool
  8. When you are ready to eat, place the flour, eggs and breadcrumbs in 3 separate plates
  9. First coat the meat rolls in flour.
  10. Then dip in beaten eggs and lastly coat well with panko breadcrumbs.
  11. Spray the rolls with vegetable/ cooking oil
  12. Bake in preheated 220 degrees celcius oven for 30 minutes until the breadcrumbs become cripsy and golden
  13. Slice the meatrolls diagonally into 1cm thick pieces
Tips:
  • To taste the seasoning of the meat rolls before steaming them, take a small portion and put in microwave for around 1-2 minutes. If not salty enough can add more salt.
Gong Xi Fat Chai
May this year be filled with joy and happiness.

Monday, January 31, 2011

Date and Walnut Scones


Well I have a problem and it's quite serious. I have a craving, and I really need to find a solution to satisfy my cravings. I'm addicted to scones!....*blush* I have been making scones after scones, and searched up and down for the best scone recipe because I love those scones at my workplace so much ( I believe I mentioned this many times before in my previous posts....). Since I'm going back to Melbourne next week, probably won't be coming back to Ballarat anytime soon, I need to find a recipe I can replicate at home and make scones whenever I want to.

I think I've found "The One". The scone recipe that I shared last week was great. But date and walnut? The best so far...Well I might change my mind when I come up with a new combination, but so far this one is the best for me and my hubby. Well I found out that hubby doesn't like savoury scones. But he loved these date and walnut scones. He thinks they are better that bakers delight's. I'm not sure if they are better than bakers delight's but they sure were yummy. I used the same basic recipe that I used for my savoury scones, except that I added sugar, a little bit more butter and used dates with walnuts instead. The tops stayed crispy after 1-2 days which was great, and we just put them in the microwave for about 2 mins to warm them up and they were as good as coming out fresh from the oven. Hope you like them as much as we do.


Date and Walnut Scones

Ingredients:
  • 2 cups plain flour, sifted
  • 1 tablespoon baking powder

  • 100 grams cold butter, cubed

  • 1/4 cup dates, chopped

  • 1/2 cup chopped walnuts

  • 1/3 cup sugar
  • 180mls or 3/4 cup thickened cream

  • Pinch of salt

  • Milk to glaze prior to baking

Methods:

  1. Add flour, baking powder, salt and sugar to mixing bowl. Mix well.

  2. Add in cubed butter and mix together until small clumps form. You can use hand or food processor if you have one

  3. Then add in dates and walnuts.

  4. Add in thickened cream and use a fork to mix together until the dry ingredients are moistened

  5. Pour out all the ingredients onto floured surface and lightly mix until the dough comes together. Be careful not to overmix the dough or the scones will become really hard

  6. Form a ball and cut into 6 triangles or you can use cookie cutter and cut into small rounds as well.

  7. Glaze the scones with milk before baking

  8. Bake in preheated 220 degrees celcius for 15-17 minutes until tops are browned and crunchy

  9. Serve with butter

Tips:

  • I found that my scones spread out a little bit when I baked and became a bit flat. What I noticed from this cafe at my workplace was they flipped the scones sideways halfway through baking. I will try this next time. So halfway through baking maybe after 5-6 minutes, I will try to change the position of the scones so that the sides are facing up. This might help to keep the scones tall. I have not tried this before but saw the owner of this cafe doing this and has maintained good height for their scones. =)

Saturday, January 29, 2011

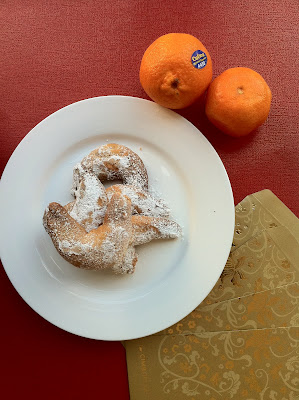
Chinese New Year Bake #2 - Kue Putri Salju


This is another traditional Indonesian Chinese New Year cookie. I don't think I have ever seen this sold in Malaysia. But I might be wrong. It's called kue putri salju ( snow white cookies) because it's dusted with icing sugar which makes it looks like it's covered in snow. Why snow white? I have no idea, maybe Indonesian loves fairy tale....?? ahhaha....I'm not sure but I guess it makes sense to call it snow white cookies as it looks pretty covered in snow-like icing sugar....=)

These cookies are usually shaped like a moon or we call it bulan sabit in Indonesian. If you feel lazy to make it moon-shaped then just make small rounds like peanut butter cookies. Try to leave some space in between cookies when you bake because it will expand in the oven and might stick to one another which will be troublesome to separate later on. What I did to shape these cookies was to roll a dough longitudinally and then bend it to make them look like moons. Also, just like my recipe for peanut butter cookies, the dough is quite sticky especially if you make it in hot Malaysia/Singapore weather. I suggest you get a bowl of flour handy next to you and dust your hands every now and then to make it more workable for you.

I'm also submitting this to Aspiring Baker #3- My favourite CNY cookies hosted by Jess' Kitchen.

Kue Putri Salju- Snow White Cookies

Ingredients:
  • 250 grams unsalted butter
  • 100 grams caster sugar
  • 250 grams plain flour, sifted
  • 200 grams ground roasted cashew nut
Icing sugar for dusting

Methods:
  1. Beat butter and sugar until soft and fluffy
  2. Add in ground cashew nuts and plain flour alternately until well combined
  3. Leave dough in fridge for 1 hour (I didn't leave it in the fridge when I made it and it still came out well). I guess leaving in the fridge will make the dough easier to work with.
  4. Shape dough into moon shapes. Dust your hands with a pinch of plain flour after rolling 3-4 cookies to make it more workable.
  5. Bake in preheated 160 degrees celcius oven for 25-30 minutes until golden brown
  6. Leave cookies to cool
  7. Once cookies are cooled, dust both sides with icing sugar

Wish all of you a wonderful and Happy Chinese New Year

Friday, January 28, 2011

Chinese Herb Salt Baked Chicken - Dong Quai Hong Cou Yim Kok Kai


I love Yim Kok Kai. When I was young, my dad would buy special " salt chicken " from a famous shop in Jakarta whenever he went there for business trip. We call it "Kiam Ke" in Hokkian aka salty chicken. I believe it's similar to yim kok kai in Malaysia. It was so delicious and my mom being a great cook herself would use the left over bones to boil the best chicken congee ever. I think it was the saltiness of the chicken and the fragrance of salt in it, it was just so good to have it with plain rice. And the congee that was made out of the bones was divine. I always looked forward to have the chicken congee the next morning for breakfast. Gee, can't believe I have been a foodie since I was like 10 years old.

Yim Kok Kai really reminds me of this kiam ke from Jakarta. I always wanted to try making it. Then I saw this recipe from the malaysian cuisine and I set my mind to make yim kok kai for dinner yesterday. I made my own adaptations to the recipe. I added some chinese herbs to it, namely dong quai and red dates. You can get them from any asian groceries. I just thought it would add a really nice fragrance to the whole dish. Something different from the traditional one. And boy was I right, the dish came out delicious. My whole family enjoyed it so much. It was so simple to make, yet so tasty and went so well with a bowl of rice. I would definitely keep making this again in the future. I also took some step-by-step photos on how I wrap the chicken in baking paper and aluminium foil with coarse salt. Hope you enjoy it.

Chinese Herb Salt Baked Chicken - Dong Guai Hong Cou Yim Kok Kai

Ingredients:
  • 3 chicken marylands - each chopped into 3 smaller pieces OR 8 chicken drumsticks
  • 500 grams coarse salt
  • Baking paper and aluminium foil
  • 15-20 pieces of red dates
  • 8 pieces dong guai
Marinade ingredients:
  • 1/3 cup shao tsing cooking wine
  • 2 tablespoons light soy sauce
  • 2 tablespoons dark soy sauce ( I used ABC kecap manis)
  • 2 tablespoons sesame oil
  • 1 tablespoon sugar
  • 1/2 tablespoon salt
  • 1 teaspoon five spice powder
  • 1 tablespoon garlic ginger paste ( you can refer to yau fan for recipe OR you can just use 1 tablespoon grated ginger)
Methods:
  1. Marinade chicken with all the marinade ingredients for at least 2 hours
  2. When you are ready to bake the chicken, preheat oven to 220 degrees celcius
  3. First of all take a big piece of baking paper and put the chicken pieces ( without the marinade sauce) on it. Then add the dong quai and red dates.

  4. Put another piece of baking paper on top and wrap the chicken pieces by folding in the sides, top and bottom. I used stapler to staple the folded sides so that they stay in place like this.

  5. Place the aluminium foil in a baking tray and spread half the coarse salt on the foil. Then, add the wrapped chicken on top of the salt.

  6. Add the remaining of the salt on top of the chicken.

  7. Lay another piece of aluminium foil on top of everything and wrap it all up.

  8. Bake in oven for 60 minutes
  9. Take chicken out of the baking paper and serve with rice.

Tips:
  • You can reuse the salt if you want so that you won't waste it. The only thing will be to wrap the chicken in another layer of baking paper if you really want to recycle the salt because the sauce from the chicken sometimes will leak out of the baking paper and the salt might become wet from the sauce. So to prevent that I'll just wrap the chicken with another layer of baking paper before putting it on top of the salt.
Another CNY bake coming up tomorrow. Kue Puteri Salju - Snow White Cookies, another traditional Indonesian CNY cookies.